Training a classification model for Firefly-DL using TensorFlow framework
The process of training a neural network can be challenging. This application note describes how to setup your computer and train a custom classification model that is compatible with Firefly-DL cameras. We use TensorFlow (TF) framework to train a custom model. The source code can be found in this GitHub repository https://github.com/FLIR/iis_firefly_image_classifier. The repository contains code for training and evaluating several widely used Convolutional Neural Network (CNN) models, which can easily be used to train an image classification model on your own datasets. It also contains scripts that allow you to convert your image dataset to TensorFlow's native TFRecord format, train models from scratch or fine-tune them from pre-trained network weights via transfer learning. This application note aims to provide a working example using this repository.
Preparing for Use
Before using the camera, we recommend reviewing the resources available on our website:
- Camera Reference for the camera—HTML document containing specifications, EMVA imaging, installation guide, and technical reference for the camera model. Replace <PART-NUMBER> with your model's part number: http://softwareservices.flir.com/<PART-NUMBER>/latest/Model/Readme.html
For example: http://softwareservices.flir.com/FFY-U3-16S2M-DL/latest/Model/Readme.html - Getting Started Manual for the camera—provides information on installing components and software needed to run the camera.
- Technical Reference for the camera—provides information on the camera’s specifications, features and operations, as well as imaging and acquisition controls.
- Firmware updates—ensures you are using the most up-to-date firmware for the camera to take advantage of improvements and fixes.
- Tech Insights—Subscribe to our bi-monthly email updates containing information on new knowledge base articles, new firmware and software releases, and Product Change Notices (PCN).
Prepare Image Dataset
Option 1: Flowers Dataset
Here we provide an example image dataset of five different types of flowers. This section is optional, and if you have your own dataset, you can jump to Option 2.
Download and Extract Flower Dataset:
As an example, we use the Oxford Flowers dataset to train our model. This dataset can be downloaded from the following link:
http://download.tensorflow.org/example_images/flower_photos.tgz.
The flower images are organized and labelled using the parent directory name. The entire dataset is split to five classes/folders according to the flower type:
- Daisy
- Sunflowers
- Roses
- Tulips
- Dandelion
Option 2: Prepare Your Own Images
Collect Your Own Data:
First, you must collect and label some images that you would like to use to train the classification model on.
- Collect training images.
- Save your training images using one of the following supported formats: 'jpg', 'jpeg', 'png', or 'bmp'.
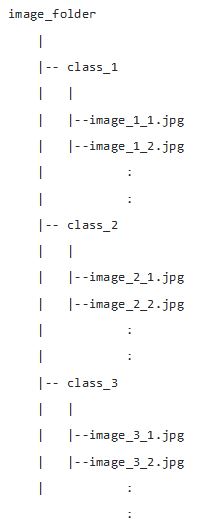
- Organize the images into subfolders and label each class/folder using the directory name.
- Each image must be included in only one folder (representing the class)
- The ground-truth label for each image is taken from the parent directory name.
- An example folder structure is shown below:
Setup
In this section, we go through the training environment requirements and setup process in preparation for running the training scripts.
Note: You can train a model using CPU. However, we highly recommend using GPUs and installing the required Nvidia Cuda software and drivers for training models. We validated the following system configurations work.
|
GPU and Driver |
Driver |
OS |
CUDA |
nvcc |
cuDNN |
|
GTX 1080 Ti |
460.39 |
Ubuntu 18.04 LTS |
10.1 |
10.1 |
7 |
|
GTX 1080Ti/1050/1050Ti/950 |
460.39 |
Ubuntu 20.04 LTS |
11.2 |
11.2 |
8.0.5 |
|
RTX 2080 Super |
460.67 |
Ubuntu 20.10 Groovy |
11.2 |
11.2 |
8.0.5 |
|
RTX 2080/2070 Super |
461.92 |
Windows 10 |
11.2 + 10.0 |
11.2 |
8.0.5 + 7.4 |
Setup environment using Docker
Prerequisites
We recommend starting with a fresh Ubuntu system with Docker-ce already installed. The following link provides a helpful guide on to how to install Docker on your system.
https://docs.docker.com/engine/install/ubuntu/
We validated that the following software configurations work.
|
OS |
Docker-CE |
Docker Image |
|
Ubuntu 18.04 |
20.10 |
docker pull asigiuk/tf1.13-ncsdk-gpu-runtime:latest |
|
Ubuntu 20.04 LTS |
20.10 |
docker pull asigiuk/tf1.13-ncsdk-gpu-runtime:latest |
|
Ubuntu 20.10 Groovy |
20.10 |
docker pull asigiuk/tf1.13-ncsdk-gpu-runtime:latest |
Installation
You can use our pre-built docker images to run our container environment. First, pull the image for our public repository:
docker pull asigiuk/train_classifier:latest
Train Model
After preparing and labeling your image dataset, you can start training a model inside your training environment.
Run docker container with GPU
docker run --gpus all --rm -it --name train_classifier_1 --net=host \
-v <path/to/image_folder>:/home/image_folder \
-v <path/to/output_folder>:/home/output \
asigiuk/train_classifier:latest \
--model_name=mobilenet_v1 --batch_size=8 --learning_rate=0.001
Run docker container without GPU
docker run --rm -it --name train_classifier_1 --net=host \
-v <path/to/image_folder>:/home/image_folder \
-v <path/to/output_folder>:/home/output \
asigiuk/train_classifier:latest \
--model_name=mobilenet_v1 --batch_size=8 --learning_rate=0.001
Note: You must supply the following input arguments:
- Replace <path/to/image_folder> with the path to your image folder (Parent folder to the class folders).
- Replace <path/to/output_folder> with the path to your desired output folder.
Optional input arguments: A full list of the available training input arguments can be found here. Add these arguments at the end of the command above.
- Model name (--model_name): The name of the architecture to train. Default: mobilenet_v1. (Options: mobilenet_v1_025, mobilenet_v1_050, mobilenet_v1_075, mobilenet_v1, inception_v1).
- Batch size (--batch_size): The number of samples in each batch. Default: 16.
- Maximum number of training steps (--max_number_of_steps): Default: 50000.
- Initial learning rate (--learning_rate): Default: 0.01.
Training process
- A complete training process of 50000 iterations/steps takes around 30 – 60 min to complete. This depends on several factors, such as, image size, batch size, and model size, which can result in considerable increase in training time.
- A good indication that the model is training correctly is the gradual decease in training loss at the beginning of the training process. The training loss stops decreasing at the end of the training process.
- For an advanced user, you can run the eval_image_classifier.py script and Tensorboard application to monitor the training process in detail. For more information, please refer to the readme file in the Github repository.
Stop and resume training
The training script automatically stops the training process and saves the latest model weights when the maximum number of iterations is reached. This is specified using the --max_number_of_steps flag in the training script (default: 50000). You can manually stop training before reaching the maximum number of iterations by pressing Ctrl+c keys on your keyboard. In addition, you can resume training from the latest saved model by specifying the target experiment using the --experiment_name flag. For more information regarding the experiment structure refer to the readme file in our Github page.
Test Model
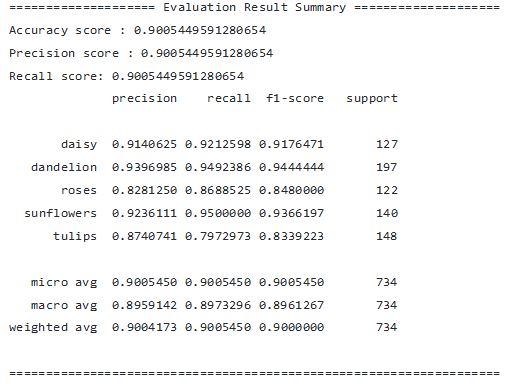
After training is complete, the model is automatically evaluated on test dataset and the results are printed out on the command line as shown below:
Deploy Model
After training is completed, the training script automatically saves the output model (firefly.graph) to your project folder. An example file path is given here /project_dir/<project name>/experiments/<experiment name>/firefly/firefly.graph.
Please note that the full path to the saved model might be different on your computer depending on the project name and experiment number.
Use SpinView to deploy your model to the camera.
Here are the steps for deploying and configuring your Firefly-DL camera.
1. Download and install Spinnaker SDK. Spinnaker SDK version 2.3 (or newer) can be found on Teledyne FLIR’s website at https://www.flir.com/products/spinnaker-sdk/
2. Open SpinView, connect Firefly-DL to your PC using a USB3 port and select the camera.
3. Select the File Access tab.
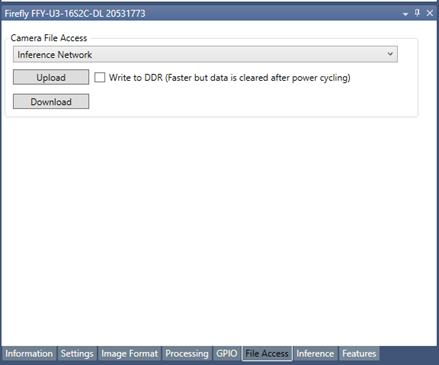
a. From the Camera File Access dropdown, select the Inference Network option.
b. Click upload. Then select the trained model “firefly.graph” file
4. Select the Features tab and expand the Inference Preprocessing node.
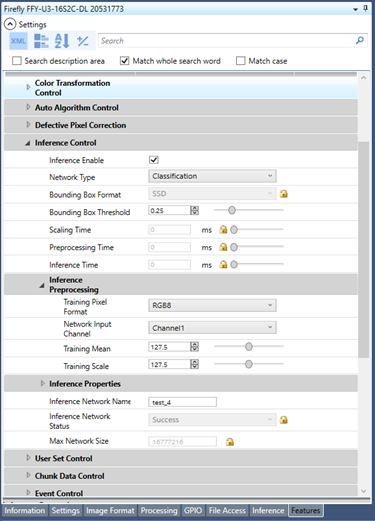
a. From the Training Pixel Format dropdown select Mono8 or RGB8 depending on the training images.
b. From the Network Input Channel dropdown select Channel 1.
c. Set the Training Mean to 127.5 and the Training Scale to 127.5.
d. Repeat for Channel2 and Channel3 for RBG8.
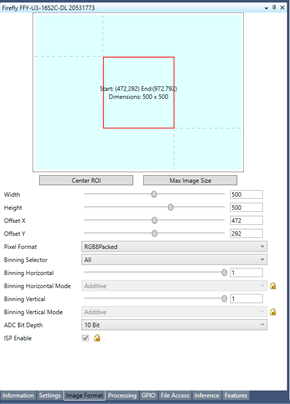
5. From the Image Format tab, configure the ROI based on your training images.
6. Select the Inference tab.
a. Select Inference Enable.
b. Select Chunk Mode Active.
c. From the Chunk Selector dropdown select Inference Confidence.
d. Select Chunk Enable.

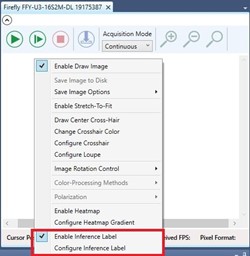
7. Right-click on the streaming window and select Enable Inference Label.
8. Click on Configure Inference Label.
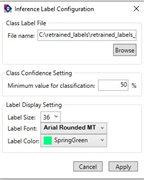
9. In the pop-up window, click browse to navigate to the label text file and click Apply.
- The label text file (label.txt) can be found under the following directory. /project_dir/<project name>/datasets/<dataset name> label.txt.
10. Click on the green play icon to start camera acquisition.
When the camera is pointed to the scene that the network is trained to classify, the inference results (e.g, class and confidence) are shown in SpinView in real time. Now you can see your neural network in action.