Setting an IP address for a GigE camera to be recognized in Linux
Last Revision Date: 7/13/2016
This article describes three methods to set compatible IP addresses.
In order for a GigE camera to be recognized in Linux, the IP address of the camera and the Ethernet adapter used by the camera must be compatible. The camera assigns its current IP address using one of three options:
- Persistent—Uses the defined IP address. If not available, then;
- DHCP— Attempts to find a dynamic IP address. If not available, then;
- LLA—Uses the default IP address.
Method 1—Setting a Persistent IP
Persistent IP means that the IP address of the camera remains a fixed value, as defined by the user. It is the recommended method for setting compatible IP addresses.
Step 1—Disable Reverse Path Filtering (RPF)
Before an address can be assigned, the user must disable reverse path (RPF) filtering. RPF ignores incoming packets on an interface if traffic to the source of the packet would not be routed on that interface. It is a security feature that limits the effect of DDOS attacks. In Ubuntu 9.04 and later versions, this feature is enabled by default.
RPF can be disabled temporarily (until the next reboot) or permanently.
- To temporarily disable reverse path filtering for eth1, in the terminal, enter:
sudo sysctl -w net.ipv4.conf.all.rp_filter=0sudo sysctl -w net.ipv4.conf.eth1.rp_filter=0
- To permanently disable reverse path filtering:
1. Comment out the lines specified below in /etc/sysctl.d/10-network-security:
# Turn on Source Address Verification in all interfaces to # in order to prevent some spoofing attacks.
## net.ipv4.conf.default.rp_filter=1
## net.ipv4.conf.all.rp_filter=1
2. Restart the computer.
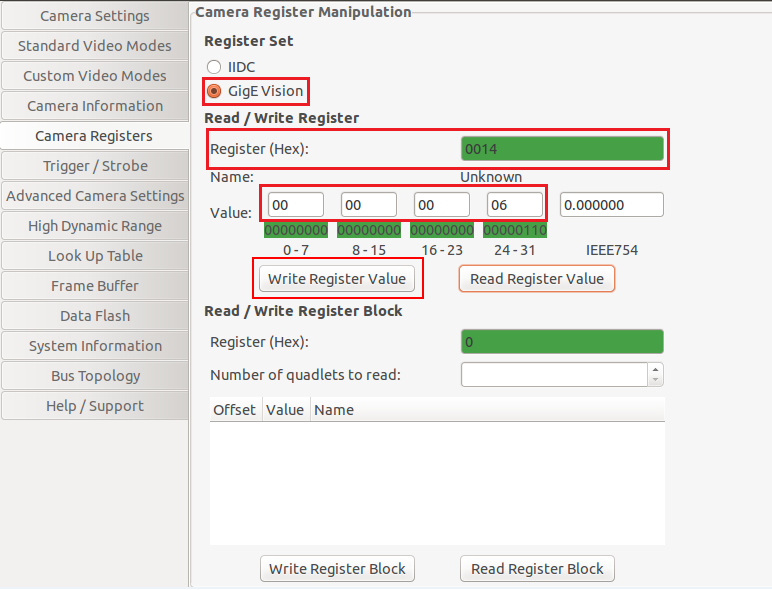
Step 2—Access GigE Registers
Connect the camera and use GigE register 0x0014 to set the camera to a persistent IP. To access the GigE register:
- Open FlyCap2.
- In the Camera Selection window, click Force IP to have the camera recognized.
- Click Configure Selected.
- In the Camera Control dialog, select the Camera Registers tab and choose GigE Vision.
- Enter GigE register 0x0014 and click Read Register. The current IP configuration is defined at GigE register 0x0014 as follows:
bit[29] LLA is activated (always 1)
bit[30] DHCP is activated on this bit
bit[31] Persistent IP is activated on this bit
- Toggle bit[31] and click the Write Register Value button to activate persistent IP.
Step 3—Assign a Persistent IP address
To assign a persistent IP address /subnet mask, enter your preferred values into the corresponding GigeE register values:
0x064C bits[0-31] persistent IP address
0x065C bits[0-31] persistent subnet mask
0x066C bits[0-31] Persistent Default Gateway (set this to 0.0.0.0)
Once a persistent IP/subnet mask is set, the camera always starts up with that IP/subnet mask settings.
Step 4—Assign an IP address to the Ethernet adapter
To ensure the camera is recognized, the Ethernet adapter connected to the camera must have a compatible IP address/matching subnet mask. For more information and help setting an address, use an IP address calculator.
To configure the connection with the new IP address/subnet mask:
- In Ubuntu, open the Network settings window, select the Ethernet connection you are using, and click Configure.
- Select the IPv4 Settings tab, and modify the network’s IP address and subnet mask value. Click Apply.
- In the Network settings window, select the Ethernet connection just modified, and toggle it off, then toggle it on. This initializes the connection with the new IP address/subnet mask.
Method 2—Dynamic Host Configuration Protocol (DHCP)
Both the camera and the adapter are set to obtain an IP address automatically. This means that the IP address dynamically changes (within a range) every time the camera or computer is restarted. It may take up to one minute for the IP address to resolve and the camera to enumerate. Advanced users may choose to set up their own DHCP server for their cameras.
Method 3—Link Local Address (LLA)
LLA uses address block 169.254.x.x. In order for the camera to be recognized, the Ethernet adapter needs to have a compatible IP address and matching subnet mask; see Method 1, Step 4—Assign an IP address to the Ethernet adapter.
Related Articles
-
 Others
FLIR.de
Read the Story -
Others
FLIRArabia.com
Read the Story -
Others
FLIR.se
Read the Story