Ways to Accelerate Vision System Output
In a variety of applications from automated optical inspection to sports analytics getting the most amount of detail from a moving target is critical. System developers are constantly looking for ways to increase framerates without compromising on image quality, ideally at minimal or no extra cost. Similarly, applications where bandwidth limitations are a concern, it is essential that system developers find ways to reduce the data transmitted from cameras. Furthermore, applications where data storage and/or write speed limitations exist, it is important that image files are kept as small as possible.
To achieve these aims, system developers can use one or a combination of the features, products, and methods listed below.
Feature: Lossless Compression- Maximizing GigE Framerates
Benefits:
- Increase FPS
- Lower Data Transmission
- Minimize Disk Space Usage
- Optimize Multi-camera setups
The Lossless Compression feature compresses the image data on the camera, transmits the compressed file to the PC, upon reaching the PC the file can then be uncompressed, or saved in its smaller, compressed form. There is no loss of data; your images remain intact.
With this feature, the following benefits can be achieved:
- Delivers up to 70% higher maximum frame rates
- Lowers data transmission over the link
- Minimizes disk space usage
- Maintains 100% image data
- No added costs
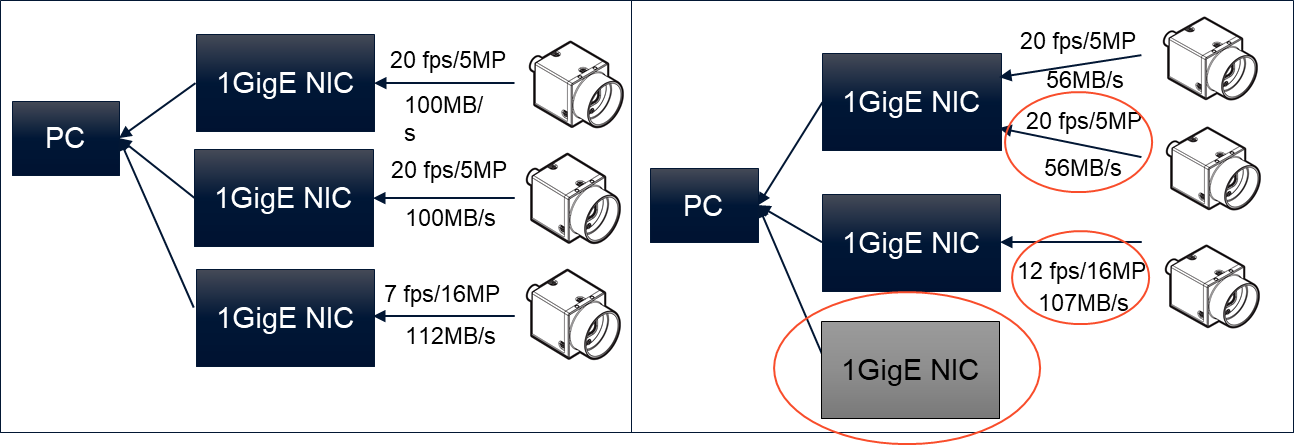
This figure shows two system setups, where LLC is not enabled on the left, and LLC is enabled on the right; these examples showcase how LLC can eliminate the need for an additional host adapter, and also improve max framerates (example assumes 1:1.8 compression ratio)

Product: Quartet Embedded Solution for TX2
Benefits:
- Optimize Multi-Camera Setups
- Increase FPS
- Onboard Processing

Image 1: Quartet TX2 Carrier Board connected to 4 x USB3 Board Level Machine Vision Cameras
The Quartet Embedded Solution for TX2 enables easy integration and simultaneous streaming of up to 4 x USB3 machine vision cameras at full bandwidth. This custom carrier board provides a fully integrated SOM design which optimizes size and cost by eliminating the need for peripheral hardware and host systems. By offering 4x TF38 connectors and dedicated USB3 host controllers per port, system designers can now easily integrate multiple fully featured machine vision board level cameras into their embedded vision systems.
Take a look at our TX2 Carrier Board product page for more details.
Sign Up for More Articles Like This
Multi-Camera Optimization
Benefits:
- Improve Bandwidth Utilization
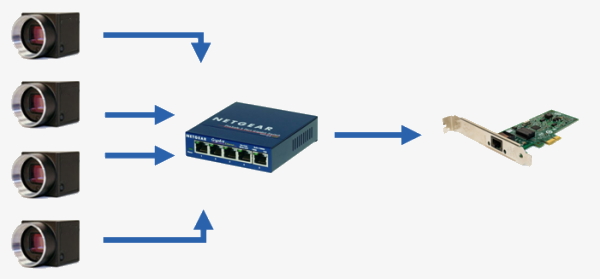
Figure 2: Multiple BFS-PGE cameras connected to a gigabit ethernet hub, which is then connected to a gigabit host adapter
For multi-camera systems, there are a number of parameters that can be optimized. Our experts discuss the following parameters and more in “Setting up Multiple GigE cameras with Spinnaker” and “USB3 3.1 Multiple Camera Setup”
- Using multiple host adapters or a hub/switch will determine the overall bandwidth limitation seen by a camera. Using multiple host adapters means each host adapter provides full interface bandwidth; using hubs/switches may limit total camera bandwidth to the interface bandwidth limit, but they can also be used universally by desktop, laptop and embedded system devices.
- DeviceLinkThroughputLimit is a camera setting that determines the total bandwidth each camera can take up. When using multiple cameras on one bus/host adapter, its important to reduce this to ensure that the combined bandwidth of all of the cameras do not exceed the bandwidth limitations of the interface, while maintaining a certain value to achieve your application required resolution/framerate combination.
- System Components are important to determine the processing performance of a computer/host system. It’s important to know the specifications necessary to run multiple cameras, and what kind of performance you can expect for a given hardware system
All of these settings can be manually configured individually in Windows, for each GigE host adapter. Instructions for this is described in detail within our article “How to optimize your Ethernet network Adapter Settings”.
Optimize GigE Network Adapter Settings:
- Benefits:
Increase FPS
Eliminate Data Loss
Improve Reliability
Having the correct network adapter settings is crucial to achieving maximum possible bandwidth throughput without any dropped packets. These include:
- Receive and Transmit buffers determines the system memory that is used by the adapter; increasing these values improves the overall performance of the system when dealing with traffic (or in this case, image data).
- Similarly, increasing Packet Size (also known as jumbo packets) minimizes the number of interrupts necessary for the CPU, thereby reducing the CPU usage, again improving performance.
- Adapter IP Address, Subnet Mask, and Default Gateway are all important labels that are important to match with our GigE cameras so that the cameras are properly recognized on each host adapter.
All of these settings can be manually configured individually in Windows, for each GigE host adapter. Instructions for this is described in detail within our article “How to optimize your Ethernet network Adapter Settings”.
For Spinnaker SDK users, the Adapter Config Utility application makes it easy to choose the best values to optimize all your GigE/10GigE ethernet adapter settings for maximum performance, allowing you to update the settings on a GigE host adapter automatically, or even all of the GigE host adapters, simultaneously.


Image: the GigE Adapter Config Utility makes it easy to optimize GigE Network Adapter Settings
Framerate Optimization
Benefits:
- Increase FPS
There are a number of camera settings that can be used to optimize framerate; for example, reducing the region of interest (or specifically, the number of pixels being used for the height) will increase the max framerate beyond it’s listed maximum. Some other settings that are important to consider when optimizing for max framerate are as follows:
- Bit Depth determines the number of bits associated with each pixel; reducing the bit depth to the lowest valuable available provides the largest max framerate option.
- Exposure Time determines the amount of time an image is exposed to light; in order to achieve the camera’s max framerate, the exposure time should never be larger than 1 over the max framerate.
- Pixel Format determines the format used for representation of image data; by choosing an 8-bit pixel format, it provides the largest max framerate option.
- Exposure/Gain/Balance White Auto are all auto settings that when enabled, can reduce the max framerate, so it’s important to have all of these disabled.
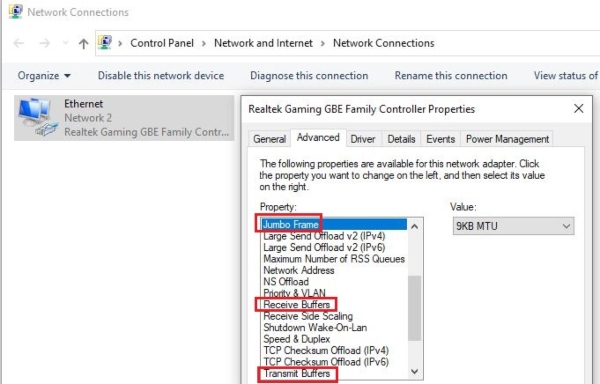
Image: Settings like Exposure Time/Auto can be changed manually using GenICam software, like Spinnaker
It is straightforward to modify these settings manually through GenICam compatible software. However, for those who use our Spinnaker SDK, our SpinView GUI application has an “Optimize Camera Framerate” feature which will automatically modify all of the camera settings listed to ensure the associated camera will operate at its current maximum framerate. In the streaming window, simply click on the “FPS” button (found between the histogram and recording window button) to do so. These instructions are also found in: “How to optimize your Ethernet network Adapter Settings”.
Thank you for reading! Please be sure to come back often for new updates.
Related Articles
-
 Choosing a Camera
Lossless Compression: Maximizing Framerates and Surpassing GigE Bandwidth Limitations
Learn more -
 Deep Learning
Ways to Accelerate Vision System Output
Read the story -
 Choosing a Camera
Biomedical Imaging: Guide to Choosing Machine Vision Camera Specifications and How to Calculate Them
Learn more