FLIR thermal imaging cameras reveal hidden defects in floor heating systems
The best heating system a house can have is the one you don’t realize is there. That is why radiant floor heating systems are so appealing and increasingly popular. However, their invisibility can also be a disadvantage. Because, how can you tell when something is wrong with your heating system? The only efficient way you can do this is by using a thermal imaging camera.
In a radiant flooring system, heat is provided by hot-water tubes or electric wires installed below the floor. As the invisible waves of thermal radiation rise from below, they warm up any objects they strike, which radiate that captured heat in turn. Radiant floor systems are a highly efficient way to heat a house, to increase comfort and reduce energy costs. In new buildings with solid floors, the heating pipe is normally embedded in the floor screed.
Valerio Di Stefano, an Italian engineer and designer who is specialized in energy management and thermography, has many years of experience with radiant flooring systems. He recently purchased a FLIR E8 thermal imaging camera, mainly to carry out energy audits on radiant systems and in buildings.
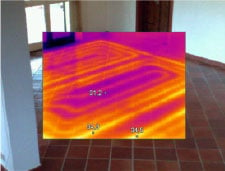
A thermal imaging camera clearly reveals the underground pipe network of a radiant heating system
Detect hidden defects
“Radiant systems have become very popular in recent years, especially in new residential constructions,” says Valerio Di Stefano. “However, sometimes a system that is apparently running properly will have hidden defects. There can be problems with the way the screed floor was made, how the pipes were laid, or problems with the optimization of energy transport. The good news is that all of these problems can be quickly detected by a thermal imaging camera.”
“Normally, without a thermal imaging camera, you would have to look at the pumps and deduce from that information what is going on underground. But with a thermal imaging camera, you have an immediate overview over your entire floor heating system, thanks to the heat which is given off by the system.”

Valerio Di Stefano: The FLIR E8 thermal imaging camera has moved my business forward and helped me to win more projects.
Thermography for floor heating in practice
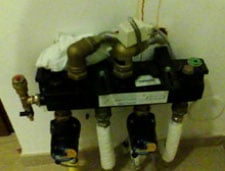
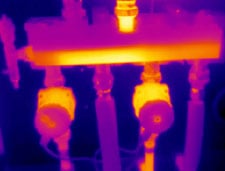
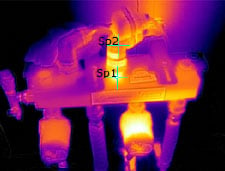
Figures 1a/1b/1c show a manifold that feeds a radiant heating system with circulator pumps, one for each manifold section. Points Sp1 and Sp2 actually are almost at the same temperature but having set the same emissivity value leads to misleading conclusions. In reality, electrical tape has been applied to Sp1, which has an emissivity that is very close to the value set in the instrument. Therefore, the fluid flow is actually at 44°C and not at 30.5 °C.
Figure 2 shows a radiant circuit during start-up, digitally fusing the thermal and the visual images. Profile analysis has been performed on the pseudo orthogonal lines Li1, Li2 and Li3, running over the pipes. On the right, line Li2 shows a colder, uneven area which should be investigated further, since it may mean that there are changes in the thickness of the screed or in the adhesive used for finishing. Line Li4, in green, highlights this thermal variation that should not occur along just a few decimeters of pipe.
There is some debate about whether or not to place underground heating under fixed furniture. The argument against doing this is that the heat rising from the floor can cause kitchen units to ‘sweat’, meaning that they collect condensation. Heating laid beneath the units can also heat the units themselves and whatever you store within them, including food supplies. The argument for installing underfloor heating beneath fixed furniture is various. For one thing, in cases where the room layout has not been decided upon it is probably beneficial to install the underfloor heating pipe throughout the room.
Be it as it may, the presence of a radiant system behind furniture or other obstacles basically increases the inertia of the system both during startup and shutdown and does not really help control the room’s temperature. Actually, it creates a barrier to heat flow towards the areas occupied by the obstacles, a barrier which obviously has a cost in terms of energy. This is demonstrated in Figure 3.
FLIR E8: compact and cost-effective thermal imager
Valerio Di Stefano has been using a compact FLIR E8 point-and-shoot camera for inspections of floor heating systems.
“I really discovered the power of thermal imaging during an Infrared Training Center (ITC) course in 2013,” says Valerio Di Stefano. “I evaluated different camera models, but ultimately I opted for the FLIR E8 point-and-shoot model, because this one offered the best price-quality ratio, and the most interesting functionality in a compact package.”
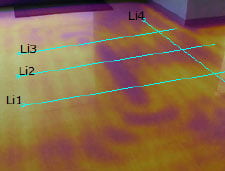
Figure 2: Radiant circuit during start-up
The FLIR E8 has a 320×240 detector, a focus-free lens and simple button navigation to on-screen settings, imaging modes, measurement tools, and saved JPEGS. The camera is amazingly easy to operate, even with just the press of a single gloved thumb. The E8 also features FLIR’s proprietary MSX® Thermal Image Enhancement functionality, which adds key details from the onboard visible light camera to the entire infrared image in real time.
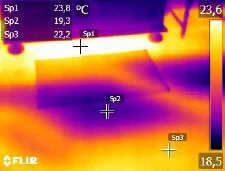
Figure 3: The presence of a radiant system behind furniture or other obstacles basically increases the inertia of the system both during startup and shutdown. Sp1 Temperature 23.8 °C, Sp2 Temperature 19.3 °C, Sp3 Temperature 22.2 °C
“The FLIR E8 gives me good image detail and I can use it for various applications, besides floor heating inspections, such as solar panel monitoring. In any case, the FLIR E8 has moved my business forward and helped me to win more projects.”
