Using FLIR USB3/USB2 Cameras with Cognex VisionPro
Subject
Technical Application Note (TAN2014019): Using FLIR USB3/USB2 Cameras with Cognex VisionPro
Applicable Product(s)
- All FLIR machine vision USB 3.1 or USB 2.0 cameras
Application Note Description
This application note provides information on how to configure and use FLIR machine vision USB3/USB2 cameras with third-party Cognex VisionPro software.
This document provides examples using Cognex VisionPro v8.2. For more information, visit the Cognex website.
Preparing for Use
Before you use your camera, we recommend that you are aware of the following resources available from our downloads page:
- Getting Started Manual for the camera—provides information on installing components and software needed to run the camera.
- Technical Reference for the camera—provides information on the camera’s specifications, features and operations, as well as imaging and acquisition controls.
- Firmware updates—ensure you are using the most up-to-date firmware for the camera to take advantage of improvements and fixes.
- Tech Insights—Subscribe to our monthly email updates containing information on new knowledge base articles, new firmware and software updates, and Product Change Notices (PCN).
Installation and Configuration
Follow these steps to use Cognex VisionPro with FLIR machine vision USB3/USB2 cameras:
- Install Cognex VisionPro.
- Install Spinnaker SDK or FlyCapture2 AIK.
- Connect the Camera to the PC.
- Start Cognex VisionPro Software.
- Capture Images
The following sections provide more detail.
Step 1—Install Cognex VisionPro
The examples used in this document are from Cognex VisionPro v8.2. It is available for download from the Cognex website.
Cognex did not support Windows 10 until VisionPro 9.0. The AIK will not run on
Windows 10 with earlier versions of VisionPro.
Step 2—Install Spinnaker SDK or FlyCapture2 AIK
For USB2 or USB3 cameras, the Spinnaker SDK or FlyCapture2 AIK must also be installed.
Note: which SDK you use is dependent on your camera model. See your camera's Getting Started Manual for the SDK for your model.
Step 3—Connect the Camera to the PC
Connect the camera to the PC. For information, see the camera’s Getting Started Manual
Step 4—Start Cognex VisionPro Software
To start Cognex VisionPro:
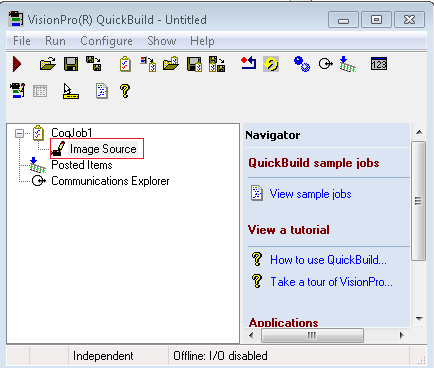
- Launch the Cognex VisionPro QuickBuild application.
Start Menu→Cognex→VisionPro→VisionPro® QuickBuild
- Double-click on Image Source to launch the Image Source and VisionPro QuickBuild Job Editor.
3. In the Image Source window, from the Image Acquisition Device/Frame Grabber drop-down, select your camera.
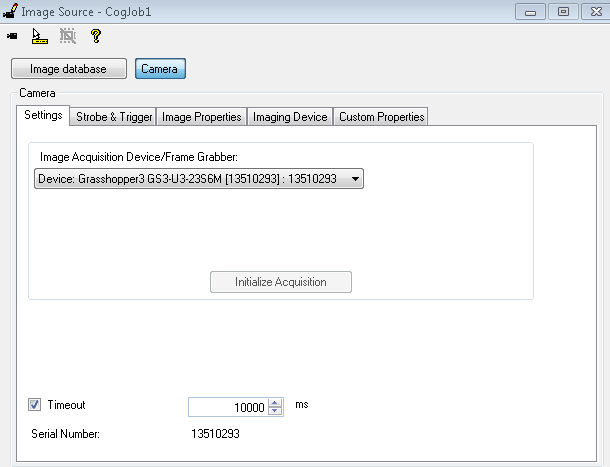
4. If your camera does not show up in Cognex VisionPro, see the troubleshooting section.
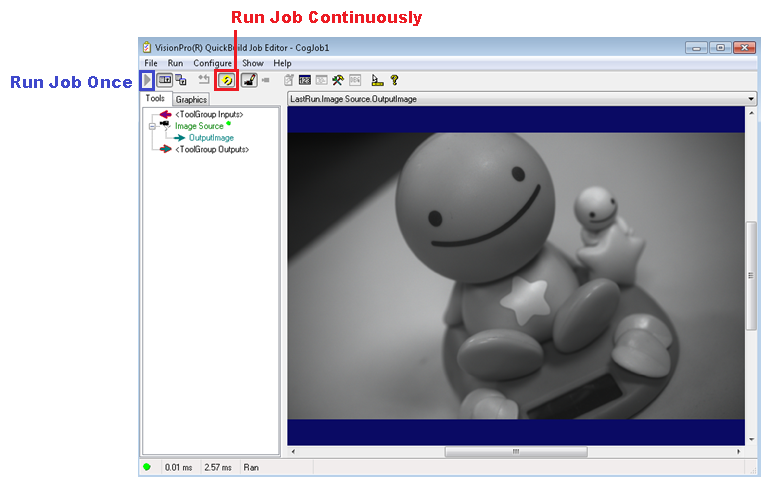
Step 5—Capture Images
To capture images:
- In the VisionPro QuickBuild Job Editor window, from the Run menu select Job Continuously. Or, click the Run Job Continuously icon.
Supported Features
This list is for reference purposes. In order for the feature to be supported in Cognex VisionPro, the camera needs to support the feature. For example, a monochrome camera will not support WhiteBalanceAuto in Cognex because monochrome cameras do not support this feature.
This list is taken from FlyCapture AIK version 2.7.
|
Iris |
IrisEnabled IrisAuto |
|
Brightness |
Read only |
|
Exposure |
ExposureEnabled ExposureAuto |
|
Sharpness |
SharpnessEnabled SharpnessAuto |
|
Hue |
HueEnabled |
|
Saturation |
SaturationEnabled SaturationAuto |
|
Gamma |
GammaEnabled GammaAuto |
|
Gain |
GainEnabled GainAuto |
|
White Balance |
WhiteBalanceBlue WhiteBalanceRed WhiteBalanceEnabled WhiteBalanceAuto |
|
Shutter |
ShutterEnabled ShutterAuto |
|
Frame Rate |
FrameRateEnabled FrameRateAuto |
|
Focus |
FocusEnabled FocusAuto |
|
Strobe |
StrobeEnabled |
|
Line |
LineMode LineSelector |
|
Trigger |
TriggerMode TriggerActivation TriggerSource |
|
Trigger Software |
Read only |
|
Pan |
PanEnabled PanAuto |
|
DCAMFormats |
Read only |
Troubleshooting
I cannot detect my USB3/USB2 camera in Cognex VisionPro
To use USB2/USB3 cameras with Cognex VisionPro, Spinnaker or FlyCapture2 AIK must also be installed. Contact Support (https://flir.custhelp.com/app/ask) to request a copy of the FlyCapture2 AIK installer.
If the USB2/USB3 camera is not streaming, verify the following:
- Is the camera detected in SpinView or FlyCap (included in the SDK)?
- Is the camera able to stream in SpinView or FlyCap2?
- Is the AIK server running?
- Is the Quickbuild application running in Administrator mode?
To verify the FlyCapture2 AIK installation:
- Open C:\Windows\regedit.exe.
- Go to [HKEY_LOCAL_MACHINE\SOFTWARE\Cognex\AIK\AdapterFlyCapture2].
- Verify the DLL pointed by the LibName string exists.

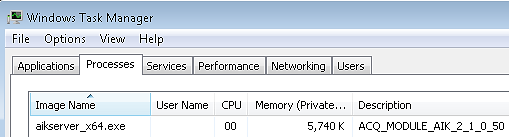
To verify the AIK server is running:
- While the camera is connected, start Cognex VisionPro.
- In the Windows Task Manager, on the Process tab, a process named “aikserver_x64.exe” (for 64-bit) should be visible. (For 32-bit, the process is “aikserver_x86.exe”.)
I cannot acquire images from my USB3/USB2 camera in Cognex VisionPro
Two common reasons for not being able to acquire images are:
- Camera is in an unknown state and needs to be restored to factory default.
- Image size exceeds default Cognex VisionPro pool size.
To restore the camera back to factory default using SpinView:
- Install the latest Spinnaker SDK, if not already installed.
- Open SpinView. The camera should appear in the Devices pane.
- Select the camera and on the Features tab search for User Set.
- From the User Set Selector, select Default and select User Set Load.
- Start acquisition. If you are able to acquire images in SpinView you should be able to acquire them in Cognex VisionPro.
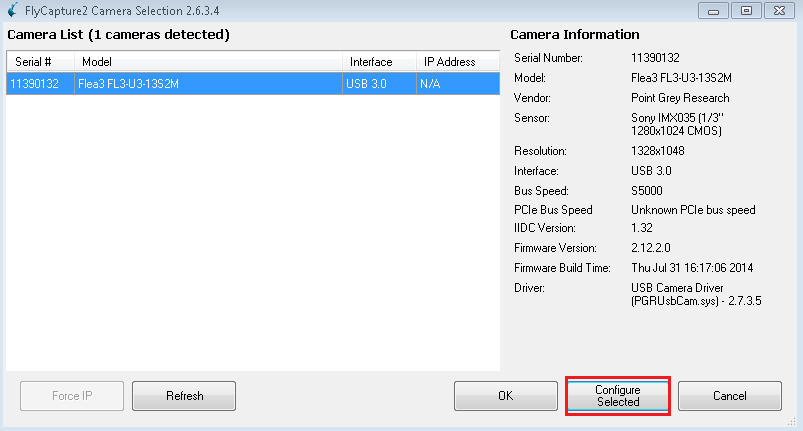
To restore the camera back to factory default using FlyCap:
- Install the latest FlyCapture2 SDK, if not already installed.
- Open FlyCap2.exe. The camera should appear in the Camera List.
- Click on Configure Selected.
3. On the Advanced Camera Settings tab, select Default Memory Channel.
4. Click Save then Click Restore.
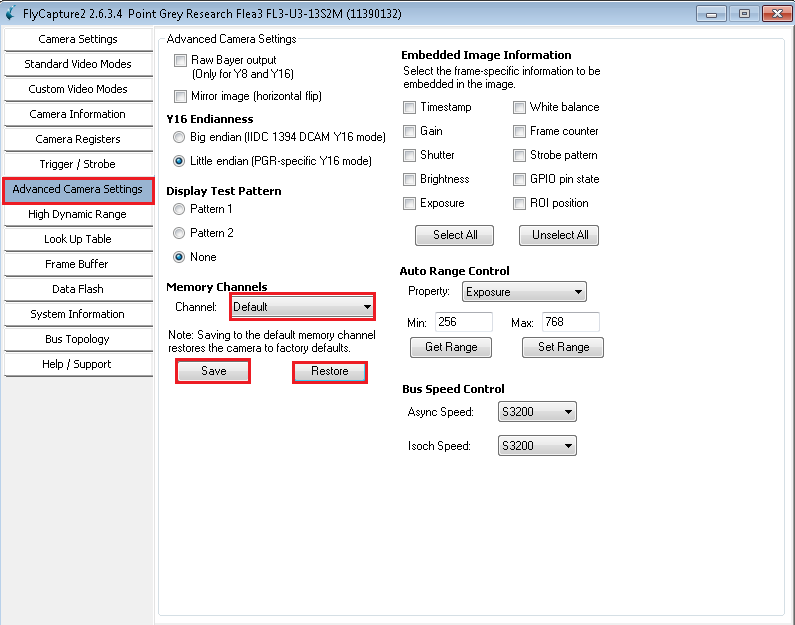
6. Close the camera settings window and click OK to acquire images in FlyCapture2. If you are able to acquire images in FlyCapture2, you should be able to acquire them in Cognex VisionPro.
To increase Cognex VisionPro’s pool size:
1. Check the current pool size.
a. In the Windows Start menu search, enter “regedit.exe.”
b. Search for the registry key:
HKEY_LOCAL_MACHINE\SOFTWARE\Cognex\AIK\AdapterFlyCapture2
c. Check the current PoolSize value.
The PoolSize should be at least four times larger than the image size. For example, the default value is 0x04000000 which is 8 MB.
0x4000000 = 67108864 bits = 8388608 bytes = 8 MB
2. Change the PoolSize registry value according to your image size requirements.
I am missing custom properties
In some cases, a property must be changed from auto to manual in order to access further settings. For example, to set the exposure time, exposure must be in manual mode.
VisionPro loads the current properties, either default or user set, into the Image Source window when the camera is selected. Any changes made to the properties, such as changing from auto to manual, must be reloaded to take effect. To reload, close the Image Source window and reopen.
I am changing to a mode that changes the resolution
When changing video modes, the user may implement a binning mode which changes the resolution as well.
To change to a mode that also changes the resolution:
- Connect the camera to the PC.
- Launch the Cognex Vision Pro QuickBuild Application from Start Menu → Cognex → VisionPro → Quickbuild.
- Double-click on Image Source to launch the Image Source and VisionPro QuickBuild Job Editor.
- In the Image Source Configuration window, select Custom Properties tab.
- Add ImageFormatControl →VideoMode, then switch to the desired mode.
- Switch to the Image Properties tab, then change the resolution to the appropriate width/height.
- Exit out of the Image Source window, then in the CogJob1 window, select the Run Job Continuously button.