Developing an Object Detection Application for Firefly-DL
The Teledyne FLIR Firefly-DL camera is capable of object detection which is a major application for on-edge deep learning inferencing. This application note describes the end-to-end development process for QR code detection run on the Firefly-DL camera. Other object detection applications can be developed following the same process.
Preparing for use
Before using the camera, we recommend reviewing the resources available on our website:
- Camera Reference for the camera—HTML document containing specifications, EMVA imaging, installation guide, and technical reference for the camera model. Replace <PART-NUMBER> with your model's part number: http://softwareservices.flir.com/<PART-NUMBER>/latest/Model/Readme.html
For example: http://softwareservices.flir.com/FFY-U3-16S2C-DL/latest/Model/Readme.html - Getting Started Manualfor the camera—provides information on installing components and software needed to run the camera.
- Technical Referencefor the camera—provides information on the camera’s specifications, features and operations, as well as imaging and acquisition controls.
- Firmware updates—ensures you are using the most up-to-date firmware for the camera to take advantage of improvements and fixes.
- Tech Insights—Subscribe to our bi-monthly email updates containing information on new knowledge base articles, new firmware and software releases, and Product Change Notices (PCN).
Overview
This article goes over a step-by-step process for developing your own object detection application for FFY-DL camera with a QR code detection example. We cover the following steps:
- Acquire Data
- Setup Training Environment
- Prepare Image Dataset
- Train Your Own Model
- Deploy Your Model
Acquire Data
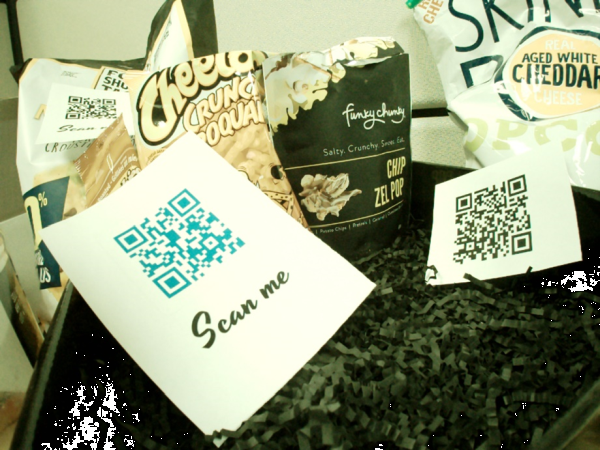
It is important to capture training images that resemble to your deployment scenario. For our application, a variety of different looking QR codes were generated, printed, and placed in different locations with different angles and lighting conditions. Below are some examples of QR code used for training.

We used a Teledyne FLIR FFY-U3-16S2C-S-DL to capture training images. You could use a mono DL camera as well for this application. We used a 5.5 mm S-mount lens. Any lens selection that offers desirable field of view and optical specification will work. Auto exposure and auto white balance were enabled for the application to work in various lighting conditions.
Other settings (configured in SpinView):
- Resolution: 1440 x 1080
- Gamma = 0.8
- Saved images in PNG format (24 bits per pixel)
The lens focus needs to be carefully adjusted to get sharp images of the QR code to facilitate automatic QR code detection. A sample training image is provided below:
A total number of 127 images were captured. We recommend creating a folder structure as follows:
\Datasets\QRData\original\Images.
A sample dataset can be found here.
Setup Training Environment
In this section, we go through the training environment setup in preparation for running the training scripts.
To ensure that the software installs and runs properly, we recommend starting with a fresh system.
We suggest using Ubuntu OS, although other OS may also work with the Docker approach.
For efficient training, we highly recommend using GPUs and installing the required Nvidia CUDA software, and drivers for training models. To use a GPU for training you must have Nvidia CUDA installed on your host machine before proceeding. We tested the following system configurations.
|
GPU |
Driver |
OS |
CUDA |
NVCC |
CUDNN |
|
GTX 1080 Ti |
460.39 |
Ubuntu 18.04 LTS |
10.1 or 10.2 |
10.1 |
7.6.5 |
|
GTX 1080Ti/1050/1050Ti/950 |
460.39 |
Ubuntu 20.04 LTS |
11.2 |
11.2 |
8.0.5 |
|
RTX 2080 Super |
460.67 |
Ubuntu 20.10 Groovy |
11.2 |
11.2 |
8.0.5 |
|
RTX 3090 |
460.67 |
Ubuntu 20.04 LTS |
11.2 |
11.2 |
8.0.5 |
Note: If you have Caffe-SSD installed in your Ubuntu machine, skip the following section, and go to Download Training Scripts section.
Setup environment using Docker
Prerequisites
We recommend starting with a fresh Ubuntu system with Docker-ce already installed. We tested the following software configurations with our docker image:
|
OS |
Docker-CE |
Docker Image |
|
Ubuntu 18.04 |
20.10
|
docker pull workingtaechqie/caffe-ssd-bionic-devel:20210713
|
|
Ubuntu 20.04 LTS |
||
|
Ubuntu 20.10 Groovy |
Installation
Download our pre-built Caffe-SSD docker image and run the training environment container. To download and run the Docker container:
docker run --gpus all --rm -it --name caffe-env-1 \
-e DISPLAY=${DISPLAY} --net=host --privileged \
--shm-size=2g --ulimit memlock=-1 --ulimit stack=67108864 \
-v /dev:/dev -v ~/Desktop:/home/docker \
workingtaechqie/caffe-ssd-bionic-devel:20210713
The download takes a few minutes. In the Docker container you should see something like:
docker@your-host-machine-name:~$
Note: The command “-v ~/Desktop:/home/docker” mounts your host machine desktop directory “~/Desktop” into the Docker container home directory “/home/docker/”. You must have a copy of your images and annotations on the desktop, so you have access to these files in the Docker environment.
The command “—name caffe-env-1” is the name of the Docker container. If you have used this name before, use a different name to avoid conflict. More information on Docker run commands can be found here https://docs.docker.com/engine/reference/run /.
Download Training Scripts
After setting up the training environment on your machine, you can clone the training repository (https://github.com/FLIR/IIS_Object_Detection.git) into your Docker container as follows:
git clone https://github.com/FLIR/IIS_Object_Detection.git
cd IIS_Object_Detection
Prepare Image Dataset
Annotation
Data annotation is an indispensable stage of data preprocessing in supervised learning such as object detection. Deep learning models learn to recognize recurring patterns in the annotated data. After an algorithm has processed enough annotated data, it can start to recognize the same patterns when presented with new, unannotated data.
Free software is available to help with annotation and offer annotation files in popular deep learning formats. LabelImg is used to annotate data (https://tzutalin.github.io/labelImg/).
General hints when using LabelImg GUI:
Set images and annotation directories.
- In LabelImg, select Open Dir, and browse to where your captured images are stored (QRData/original/Images folder) then click Select Folder.
- In QRData/original make a new subfolder called Annotations (QRData/original/Annotations).
- Select Change Save Dir, navigate to QRData/original/Annotations and click Select Folder.
For each image in QRData/original/Images, an annotation file of the same file name with extension .xml is generated in QRData/original/Annotations.
Annotate images and save label bounding boxes
A tight bounding box is defined to indicate the location of each QR code in the images.
- In LabelImg, click Create RectBox (or press w on keyboard) and place a rectangular bounding box around your object of interest, which is the QR code.
- In the label dialog, enter QR as your label and click OK.
- If your image contains more than one QR code, place a rectangular around each object and give each a label and click Save.
Since the QR codes are the only object of interest in this project, the label selection step can be skipped by choosing Single Class Mode in View. This gives a single label to all objects we annotate.
When there is no object of interest in an image, click Verify Image to generate a corresponding annotation file.
Augmentation
127 images were captured and annotated to develop this QR code detection project. Augmentation is used to create a more diversified dataset to make the deep learning model generalizable. Augmentation converts the captured images into a new, larger set of slightly altered images.
A free python library imgaug (https://github.com/aleju/imgaug) is used to perform augmentation on both the captured images and their annotations. Follow the installation guidance to setup imgaug. It can be as simple as running "pip install imgaug" on the Linux terminal.
An example script to perform the left right flip and/or top bottom flip augmentation is provided. Randomized factor is not used in this example. The augmentation script generates three augmented images (i.e., left-right flipped, top-bottom flipped, and left-right and top-bottom flipped) from each original image. The script is available at https://github.com/FLIR/IIS_Object_Detection.git.
Inside the IIS_Object_Detection folder run the command:
cd IIS_Object_Detection
python image_aug_w_bounding_boxes.py \
--input_image_dir='QRData/original/Images/' \
--input_bbox_dir='QRData/original/Annotations/'
The augmented images and annotations are saved in QRData/augmented. Put all original (127) and augmented (381 = 127 x 3) images and annotations in the same folder to prepare for training. The total number of training images is 508 (=127+381).
Note: It is important that the images are saved under a folder named Images, and the annotation files are saved under a folder named Annotations. These are expected in the following data processing scripts.
Train Your Own Model
Project Configuration
Go to IIS_Object_Detection folder:
cd IIS_Object_Detection
You can specify the training project parameters using the project.config file, which is located inside the IIS_Object_Detection directory. A sample of the project.config file is shown below.
{
"ABSOLUTE_DATASETS_PATH": “"/home/docker/IIS_Object_Detection/augmented ",
"DATASET_FODLER": "",
"DATASET_IDENTIFIER": "",
"IMAGE_FOLDER_NAME": "Images",
"ANNOTAION_FOLDERNAME": "Annotations",
"IMAGE_EXTENSION": "png",
"TEST_CLASSES": ["QR"],
"CAFFE_EXECUTION_COUNT":0,
"PROJECT_NAME": "project_name",
"TEST_SET_PERCENTAGE": 10,
"ABSOLUTE_PATH_NETWORK": "/home/docker/IIS_Object_Detection/template/MobileNet-SSD",
"PRETRAINED_NETWORK_FILE": "mobilenet_iter_73000.caffemodel",
"ABSOLUTE_OUTPUT_PROJECT_PATH": "/home/docker/IIS_Object_Detection/docker_proj/",
"PATH_TO_CONVERT_ANNOSET_DOT_EXE": "/opt/caffe/build/tools/convert_annoset",
"PATH_TO_GET_IMAGE_SIZE_DOT_EXE": "/opt/caffe/build/tools/get_image_size",
"PATH_TO_CAFFE_DOT_EXE": "/opt/caffe/build/tools/caffe",
"CONTINUE_TRAINING": false
}
Generate LMDB Dataset
Lightning Memory-Mapped Database (LMDB) is a software library that provides a high-performance embedded transactional database in the form of a key-value store.
python3 PrepareForTraining.py proj.docker.config
The line above generates the project folder and the LMDB files needed for training.
Train
cd /path/to/your/project/folder
python3 train.py your_project_folder_name.config
The training output files (*_iter_*.caffemodel, *_iter_*.solverstate) are saved under caffe_ssd/${PROJECT_NAME}/snapshot directory.
The training can be terminated early using Ctrl + c if the loss (contained in the script output) is at a satisfactory level and/or has stopped decreasing. The latest model weight is automatically saved.
Resume Training
To resume training from the latest snapshot instead of using a pretrained model, a new configuration file needs to be created with CONTINUE_TRAINING set to true and CAFFE_EXECUTION_COUNT incremented.
Resume training using the following command:
python3 train.py project_name-<CAFFE_EXECUTION_COUNT>.config
Test
An optional step is to test your trained model and evaluate the result.
cd /path/to/your/project/folder
python3 test.py project_name-<CAFFE_EXECUTION_COUNT>.config
Test mAP was reported to be 90.9% after 120000 iterations of training.
The expected output looks like:

Deploy
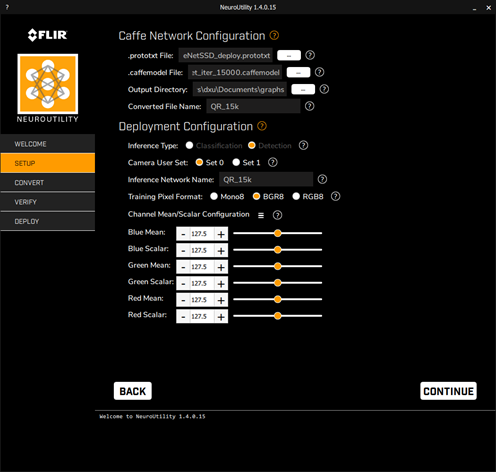
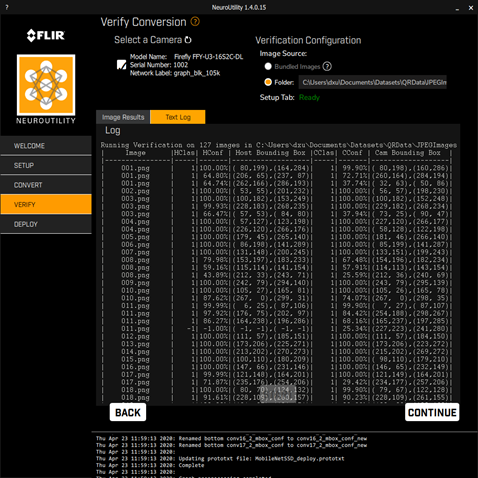
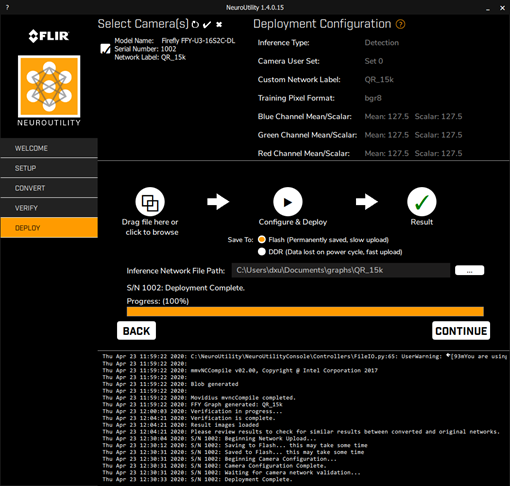
After training your deep learning model, NeuroUtility is used to convert the model to Firefly DL format and upload it to a Firefly DL camera.
The .prototxt file that contains the model nodes can be found in:
IIS_Object_Detection/${PROJECT_NAME}/MobileNetSSD_deploy.prototxt
The .caffemodel file that contains the customized model weights can be found under the following directory. The .caffemodel file associated with the largest iteration number, which is the latest model, is likely to have the best performance.
IIS_Object_Detection/${PROJECT_NAME}/snapshot/”directory with a name”mobilenet_iter_***.caffemodel
The .caffemodel file associated with the largest iteration number, which is the latest model, is likely to have the best performance.
Some screenshots of the conversion and validation steps are provided below.
Deploy to the camera
If you want to test FLIR’s QR code detection example on your FFY-DL camera, the trained model file can be downloaded from here.
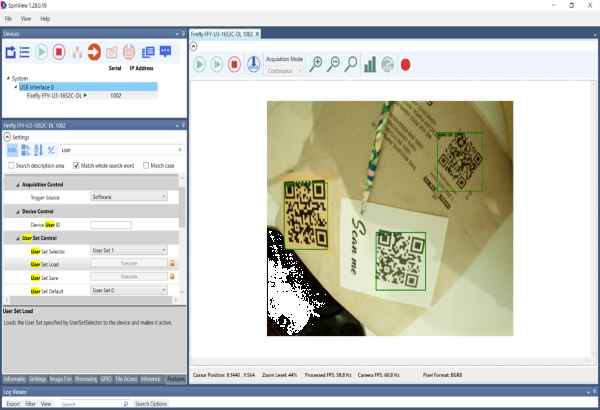
Running inference on camera
- Prepare a label file (label.txt) with two lines of content:
background
QR
You can use any text editor to make label.txt file. - Right click SpinView, select "Configure Inference Label", and Browse to the label file, click "Apply".
- Enable inference and stream the camera.
Troubleshooting
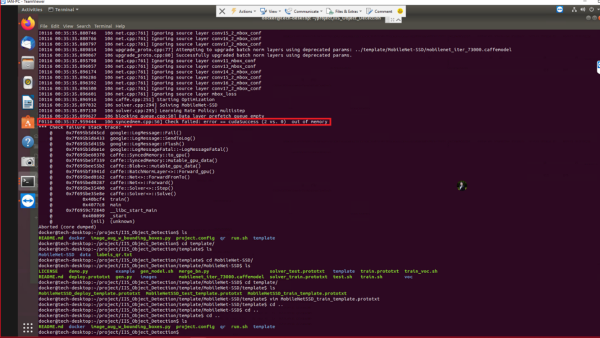
Out of memory
- This means batch size in MobileNetSSD_train_template.prototxt located at /IIS_Object_Detection/template/MobileNet-SSD/template is too large. The default batch size is set to 24. Try changing it smaller, such as 2.
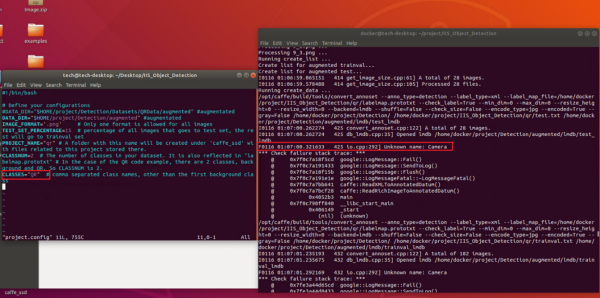
Unknown name
- This means CLASSES defined in project.config does not match with class name set in the annotation step. Make the classes consistent in the configuration and annotation files.